Tuesday, July 13, 2021

Setting the default monospace font on Raspberry Pi OS: An exercise in frustration

Many Linux distributions, including Debian GNU/Linux and Raspberry Pi OS (which is derived from Debian), use a system-wide font configuration framework called fontconfig. This uses a series of XML files to set default fonts, fine-tune font rendering, automatically detect new fonts, and more. By providing a centralized mechanism to manage fonts, fontconfig helps ensure a consistent look and feel across applications.

CUPS, the standard printing system on most Linux distributions as well as on Apple macOS, is among the numerous applications that use fontconfig. The configuration determines how CUPS renders documents that do not specify fonts, such as plain text files, for printing. For example, plain text files are printed using the default monospace font.

I followed the Arch Linux documentation for font configuration and Angelos Orfanakos's blog post on setting fonts in Debian to edit the font configuration manually. System-wide settings can be placed in ~/.config/fontconfig/fonts.conf, while per-user settings use ~/.config/fontconfig/fonts.conf.

On my Raspberry Pi 4, I was trying to change the default monospace font because the font it normally uses (Liberation Mono) looked very ugly when printed. Instead, I wanted it to use Courier New, from the Microsoft TTF Core Fonts, using the following configuration in /etc/fonts/local.conf:

<?xml version="1.0"?>
<!DOCTYPE fontconfig SYSTEM "fonts.dtd">
<fontconfig>
    <alias>
        <family>monospace</family>
        <prefer>
            <family>Courier New</family>
        </prefer>
    </alias>
</fontconfig>

However, the system wouldn't honor the setting, and it took a lot of fiddling to get it to work. I tried placing the configuration in both /etc/fonts/local.conf and ~/.config/fontconfig/fonts.conf and nothing worked. After extensive fiddling, it turns out that in Raspberry Pi OS, the monospace font is explicitly defined in /etc/fonts/conf.d/31-mono-substitute.conf. The way this is set up causes it to not accept manual changes to the monospace font in local configuration files. This is specific to Raspberry Pi OS, and is presumably there to match official documentation and educational materials released by the Raspberry Pi Foundation.

Renaming the 31-mono-substitute.conf file to disabled-31-mono-substitute.conf worked. I'd suspect it won't be kept during updates, so I subsequently created a file containing no configuration data (as above, but with nothing between the fontconfig tags) in its place to ensure that it's preserved during updates.

Now the system accepts the local font settings and plain text documents are printed with the much cleaner Courier New font. It took me two hours for me to sort this out and it frustrated me to no end.

Draco

Sunday, March 28, 2021

Running a Raspberry Pi 4 from a USB portable SSD

I've been experimenting with the Raspberry Pi 4 as both a low-cost Linux desktop computer and a server. As inexpensive as it may be, there's lots of potential in the hardware and plenty of ways to make the most out of the miniature computer. One way of doing this is to use a portable SSD instead of a microSD card.

Newer Raspberry Pi boards, starting from revision 1.2 of the Raspberry Pi 2 Model B+, have the ability to boot directly from a USB storage device such as a flash drive or portable SSD, eliminating the need to use a microSD card. The use of an SSD can greatly increase storage performance, capacity, and reliability over a microSD card (more on this below).

There are a number of considerations to doing this, some of which are specific to the Pi 4:

  • The process is relatively simple. Raspberry Pi OS ships with an "SD Card Copier" utility, listed under Accessories in the main menu, which can be used to copy the running system to another storage device.
    • This process will erase all data on the target drive, so be sure you've selected the correct drive and backed up any important data on it.
    • The target drive must use an MBR partition table. If it uses GPT partitioning, the copy process will fail, and the drive will need to be repartitioned and reformatted with an MBR.
    • After copying, the target drive will contain both a small boot partition and a large Linux ext4 partition containing the full root filesystem outside of /boot. If you'd prefer to have a smaller root partition, run resize2fs on the second partition of the target drive (usually /dev/sda2) to shrink the ext4 filesystem to the desired size, then use cfdisk on the whole disk (usually /dev/sda) to shrink the partition to that same size.
    • It should be noted that there is no snapshot functionality involved, so copies are inconsistent and will not reflect the system state at any one point in time. As a result, I'd recommend rebooting the Pi and having no other applications running before beginning this process. Any services that are particularly sensitive to data consistency, such as database servers, should be stopped as well.
  • Enabling this feature on earlier generations of the Raspberry Pi may require writing to a one-time programmable memory on the board, a permanent and irreversible process. On the Raspberry Pi 4 Model B, an EEPROM firmware update may be required to enable USB booting. For more details, see the official documentation.
  • Some SSDs can require too much power for the USB ports on a Raspberry Pi. In particular, if the drive internally uses NVMe technology, such as an M.2 NVMe drive inside a USB enclosure or a retail portable SSD rated at more than 600 MB/s, it may require large bursts of power, which can cause the drive to disconnect while in use. SATA-based drives are less likely to experience this issue.
    • I learned this the hard way while trying to use a Plugable USB-C to NVMe enclosure containing a 1TB Samsung SSD 970 EVO Plus. The system simply could not finish copying the operating system without the drive disconnecting during the copy. This issue did not occur with a 500GB Samsung SSD 850 EVO in a StarTech USB 3.1 Gen 2 enclosure.
  • Trim, which is needed to maintain optimal performance on SSDs, will not work without some manual configuration, even if the drive otherwise supports it. Jeff Geerling has a detailed blog post on how to enable it; it's a rather complicated procedure and I won't be repeating it here.

Why use an SSD instead of a microSD card?

Raspberry Pi computers are designed primarily to use inexpensive SD or microSD memory cards for system storage. However, most microSD cards are not designed to be used as the boot drive or primary storage device for a computer. Instead, they are typically optimized for sequential or streaming I/O where data is read from or written to the card in large chunks. This makes sense given that these memory cards are primarily used to store pictures, videos, music, and other media files on devices like smartphones and cameras.

But computer operating systems rely much more on random I/O, where small bits and pieces of data are read and written in many different places on the storage media. A typical SD card, with a low-power controller tuned for optimal sequential I/O performance, will often perform poorly when asked to process many small random reads and writes. SSDs can deliver much higher performance than memory cards, especially in random I/O.

An SSD will also be much more durable than a memory card when used as an operating system drive. I won't go into detail here, but suffice it to say that due to differences in flash memory controllers, firmware features and optimizations, storage capacities, and the underlying NAND flash memories themselves, an SSD will be much less prone to failure than a microSD card over extended usage in a Raspberry Pi. They also provide valuable S.M.A.R.T. information which can be used to monitor usage statistics and possibly detect imminent failure, making it easier to avoid data loss. (On Raspberry Pi OS, you'll need to install the smartmontools package to use the smartctl command and read S.M.A.R.T. data.) Of course, any storage device can fail without warning, so it's always important to maintain current backups.


Saturday, December 19, 2020

Adventures with the Raspberry Pi 4

This is something I've been meaning to do for a while... but I finally got myself a Raspberry Pi 4 Model B 4GB, along with a few essential things to go with it. It's a tiny, inexpensive Arm-based computer, designed foremost for educational use, yet versatile enough to serve as a general-purpose Linux device.

As someone who's had a fair bit of experience with Linux over the years, particularly with openSUSE on both laptops and servers, the experience is both familiar and foreign. I installed Raspberry Pi OS (32-bit) onto a microSD card using the official Raspberry Pi Imager application on Windows, and everything loaded up and worked just as expected. But coming from an RPM-based Linux distribution, there was a bit of a learning curve as I had next to no experience with the apt package manager. The LXDE desktop also took some time for me to get used to.

While I can't say the Raspberry Pi 4 can fully replace a proper PC, it performs surprisingly well for such an inexpensive computer, and it can certainly serve as a basic web-browsing and productivity device. 4 GB of RAM has proven to be plenty for a low-power Arm-based device, even with multiple tabs open in Firefox (utilization typically sits just within 2 GB). You'll probably find desktop applications to be rather sluggish, and you may have to wait several seconds to do things that a modern laptop can do in a split-second, but it's certainly usable.

For the time being, I'm simply experimenting with the Pi as a Linux desktop microcomputer, though I do have a few project ideas for the future. While the starting price for the Raspberry Pi 4, a mere $35 for the 2GB base model ($55 for 4GB, $75 for 8GB), can be extremely tempting, the cost can rapidly balloon as you add essential supplies and accessories. Memory cards, keyboards and mice, displays, fans, cases, and other items can easily add up to well over a hundred dollars. Nonetheless, it's a worthwhile experience and you probably won't regret getting one.

I'll be sharing more about getting the most out of the Raspberry Pi 4 in later posts. Stay tuned.

Draco

Sunday, September 27, 2020

Olympus BLH-1 battery and BCH-1 charger oddities

After using my Olympus OM-D E-M1 Mark III for some time, I've noticed some weirdness with the Olympus BLH-1 batteries that merited some experimentation. In particular, I found out why putting it on the BCH-1 charger at 97-99% would cause it to charge for a few moments then suddenly stop, claiming that it's full when it actually isn't.

From what I can tell, the charger is designed to drive a constant current (CC) of 1.1A to the battery at a variable voltage, up to 8.5V (as marked on the battery), for fast charging, before switching to a constant 8.4V (CV) and a gradually decreasing current to top off. This behavior is inferred from power measurements with the charger plugged into a Kill-A-Watt meter, as well as the fact that the battery is marked for 8.5V charging and not 8.4V despite having a normal 7.4V nominal voltage. (Higher-voltage Li-ion batteries rated at 3.8V per cell are typically charged to 4.35V per cell. With two cells, that would be 8.7V.)

Under normal conditions, the switchover from constant-current to constant-voltage mode can be detected as a sharp drop from about 12W on the meter to anywhere between 4W to 8W, depending on the battery's state of charge (the fuller the battery, the lower the resulting wattage). If the battery is lower, it'll charge in the faster CC mode for some time, then switch to CV mode when it reaches 80% or so. If there's more than that when the battery's put on the charger, it'll charge in CC mode for a minimum of about 20 or so seconds before switching to CV mode.

Apparently, if the battery is near full (~97% to 99% as reported by the camera), that 20-second minimum in CC mode may involve the charger pushing more than 8.5V to the battery at 1.1A and triggering the over-voltage protection on the battery before it can switch to CV mode. When OVP is triggered, the battery goes high-impedance to reject further charging, and the voltage at the terminals will be about 8.00 volts. (The battery will switch back to normal once a load is placed on it. The actual battery voltage should be about 8.30V to 8.40V.) Because of this high-impedance state, the charger immediately signals that the battery is full and stops charging (the light turns green and the meter reads zero watts).

Under normal conditions, when OVP is not triggered, by the time the charger light turns green, there is still some topping off happening: 2-3W load may be measurable on the meter, gradually decreasing to 1W before it actually stops charging. This sudden drop from 12W (CC mode charging, maximum voltage) to 0W indicates that OVP has been triggered.

I was able to confirm this after some experimentation with a jury-rigged variable-voltage supply: if I drive about 8.6V to the battery, it'll charge at an estimated 0.5A to 1.0A for some time, then suddenly reject power and read out 8.00V on the meter. If I put the battery in the camera briefly and remove it for measurement, I'll get something like 8.39V. This means the battery has detected over-voltage and rejected further charging. Now I can say that the stock charger can trigger this behavior if you put a battery on it when almost full.

Not too sure if the charger's fast-charging algorithm is a good idea, but given what I'm seeing, it's probably doing 8.6V and hitting OVP. That kind of charging regime is quite hard on the battery...

Draco

Tuesday, March 24, 2020

Some random info about the Olympus OM-D E-M1 Mark III

Last updated on April 12, 2020.

I recently purchased an Olympus OM-D E-M1 Mark III with the M.Zuiko 12-100mm f/4 PRO lens, and have additionally purchased an M.Zuiko 25mm f/1.8 lens to go with it. I've been shooting a lot with this camera, even in the midst of this coronavirus pandemic (before New York essentially went into lockdown) and have been thoroughly enjoying it.

This post is just to serve as a space for random notes and information about the camera. It isn't going to be as polished as my usual content, but perhaps some of this information will be useful to others. I'll be updating it as needed.
  • Sensor readout speed is normally about 1/60s. If the ISO sensitivity is set to 8000 or higher, it is about 1/30s. This is reflected in the flash sync speeds when shooting in silent mode (♥ heart symbol), which are 1/50s at ISO 6400 and below and 1/20s at ISO 8000 and above. In comparison, the flash sync speed of the mechanical shutter is 1/250s. (Note that flash is disabled by default in silent mode but can be enabled in the menu, under Shooting Menu 2, Anti-Shock[♦️]/Silent[♥].)
  • Accessing the camera's hidden service menu, including the shutter count, is actually simpler than what some online guides may state, e.g. this article. To do this, hold the Menu button when turning on the camera, then open the menu, open the brightness settings (Setup Menu, fourth item), and press OK. (There is no need to press Right or Info on this screen.) Then press Up, Down, Left, Right, and the shutter button, in that order. From here, pressing Right will show the camera's internal counters:
    • MS is the number of mechanical shutter actuations. This does not include shots taken with the electronic shutter, and does account for operations like pixel mapping (which requires four shutter actuations) which use the mechanical shutter. This means that the value displayed here can be relied on as an accurate shutter count. (Older Olympus cameras used R for shutter releases, which wasn't an accurate shutter count because it included electronic shutter usage.)
    • S (strobe) is the number of times the camera has fired a flash (there's no pop-up flash but the camera does count shoe-mounted flashgun usage).
    • U is the number of times the camera has activated the Supersonic Wave Filter, which removes dust from the sensor. This can be used to estimate the number of power cycles because the camera activates the SSWF every time it is turned on; however, the SSWF is also activated during pixel mapping (Custom Menu J1) so it won't be an exact value.

Tuesday, April 30, 2019

Using Wi-Fi on Panasonic LUMIX cameras to send photos directly to your PC as you take them

An underappreciated feature of many newer Panasonic LUMIX cameras is the ability to connect to a computer via Wi-Fi and send pictures directly to a shared folder. Essentially, the camera can log onto your computer, connect to an SMB share, and write photos to it. However, depending on your setup, it can take some finesse to get it to do what you want. In this blog post, I'll describe how to set up your camera to send photos directly to your PC, even when you're away from a Wi-Fi network.

To begin, press the Wi-Fi button on the camera and select New Connection > Send Images While Recording > PC. The Via Network option connects to a wireless network and is for sending images with the computer connected to that network, which works if you're at home or in a studio with a wireless router. The Direct > Manual Connection option shows the camera's SSID (network name) and password to use for the computer to connect to the camera; the computer will connect directly to the camera, independently of any wireless network. However, this is where things get tricky.

Tuesday, February 19, 2019

Using an SSD as a Linux swap device isn't (usually) as destructive as you thought it would be

It's been a while since I've posted something on this blog but there's something I'd really like to get out of my head.

I've read, and continue to read, claims from others on the Internet that putting swap space on an SSD is bad for it and will quickly kill it. However, these statements rest on the assumption that the swap space will be used heavily or that the SSD's endurance is low enough that this would cause it to fail well before the end of its designed service life. In the vast majority of situations, neither of these are true. Even on bottom-bin hardware like Bifrons (a cheap Lenovo netbook with 2 GB of memory and 64 GB of eMMC flash storage), where endurance is more likely to be an issue, it's still very likely that the flash memory will last the intended life of the system.

Several months back, I took an old 64 GB Plextor M5M mSATA SSD previously used in one of my old laptops, put it in a StarTech USB 3.1 Gen 2 enclosure, and plugged it into the USB 3.0 port on this laptop. I then secure-erased it, partitioned 8 GB of that drive as a swap partition, and enabled it as swap space. Using the Linux iostat command, I monitored the amount of data written to the drive over time as I used the system for everyday web browsing and productivity. The worst I saw was 170 GB of writes to the drive over just shy of nine days of usage, or about 20 GB of writes per day from swapping. Remember that this system has just 2 GB of memory so some swapping is likely to be unavoidable. It's also noteworthy that swappiness was set to 100, which makes the system swap more aggressively than normal (the default is 60).

20 GB per day is well within the endurance limits of most modern SSDs. A good name-brand SSD like the Samsung SSD 860 EVO will be rated for far more than that over its warranty period; the 250 GB version of the 860 EVO is warranted for five years or 150 TBW (total terabytes written). That's 84 GB per day over five years, and 20 GB is less than a quarter of this value. Even if you add another 10 GB per day (because a typical user would put the system/boot partition and the swap partition on the same disk), you're still not using even half of the drive's rated endurance within its warranty period. Even cheaper SATA SSDs with lower endurance ratings are unlikely to fail under this kind of workload.

This does not mean that swap is completely harmless, as endurance problems can still occur if you're swapping to a low-cost, low-capacity flash memory device. The eMMC flash module on Bifrons is rated by its manufacturer (SanDisk) for 44 TBW of endurance. This is 40 GB per day over three years, or 24 GB per day over five years, which should be enough to last the service life of the device. However, eMMC modules are permanently installed in the device and cannot be replaced without highly-specialized equipment (they are soldered onto the motherboard). Furthermore, the limited capacity of the device means that the typical consumer will use most of its capacity, which increases write amplification and reduces the effective endurance of the NAND, possibly below its specifications, and many netbooks of this kind have just 32 GB of storage which further compounds the endurance issue. (The same also applies to low-cost external flash memory devices like SD cards or USB flash drives.) This is, in fact, the reason I put the swap onto an external SSD and not on the system's onboard flash memory.

But this isn't the case for the vast majority of system configurations, where the benefits of placing swap on an SSD outweigh the risks. Most flash memory devices are far faster than any electromechanical hard drive; even if swapping significantly degrades system performance, the performance impact of swapping to an SSD is much lower than swapping to spinning rust. The above endurance issues only truly apply if 1) you're swapping to a cheap and small flash memory device like an eMMC chip or USB flash drive; and 2) your system has low memory and your usage patterns are such that you need to swap more than occasionally. Most systems have enough memory that swapping only happens rarely, if at all, rendering the whole endurance issue moot. And even when swapping is necessary, the drive isn't going to be written to so much that it'll exhaust the endurance of the drive and cause it to fail prematurely. Swapping isn't going to cause the drive to get hundreds of gigabytes or terabytes of writes per day. The 20 GB per day figure is the highest that one might encounter in a typical day of usage, and most users aren't going to see this much swapping.

If endurance is still a concern, there are solutions like zram which can effectively compress the contents of system memory and therefore allow more data to be stored in RAM before the system needs to swap to disk. While this comes at the cost of increased CPU usage, you'll still get better performance than if you're swapping to disk, and fitting more data into memory means that less data needs to be swapped out and written to the flash memory.

Ultimately, for the vast majority of use cases, putting swap on your SSD isn't going to kill it.

Tuesday, August 21, 2018

On NVIDIA GeForce RTX and the state of competition in the graphics card market

On August 20, 2018, NVIDIA launched a new line of graphics cards based on their new Turing architecture. Branded as GeForce RTX, these new cards boast several significant new features, including:
  • Fixed-function ASIC ray-tracing units, enabling real-time ray-tracing for the ultimate in realism (more on that below)
  • Tensor cores for AI. There are myriad applications for this, one of which is faster and smarter anti-aliasing.
  • Datacenter-grade NVLink connectivity for SLI, providing as much as 50 times the bandwidth of conventional SLI connections.
  • Redesigned shader cores with new features like Variable Rate Shading for higher performance.
  • More CUDA cores and higher efficiency enabled through the TSMC 12FFN process designed specifically for NVIDIA.
Undoubtedly, the most important new feature is the real-time ray-tracing capability. Ray-tracing enables the most realistic lighting effects possible by actually computing the paths that light rays travel. This process is extremely computationally expensive, which means it's long been been limited to movies and other media which do not require real-time graphical rendering. Instead, video games use simpler rasterization techniques which provide approximations of lighting effects. NVIDIA's new RTX graphics cards contain specialized hardware designed specifically to accelerate ray-tracing, enabling cinematic lighting effects that would otherwise be impossible to implement in video games and other real-time applications. NVIDIA has also developed RTX middleware, built on the DirectX Raytracing API, to enable game developers to take advantage of this functionality more easily.

However, there is a more sinister side to these new graphics cards.

Saturday, July 14, 2018

On the Noctua NF-A12x25: the most advanced fan ever made?

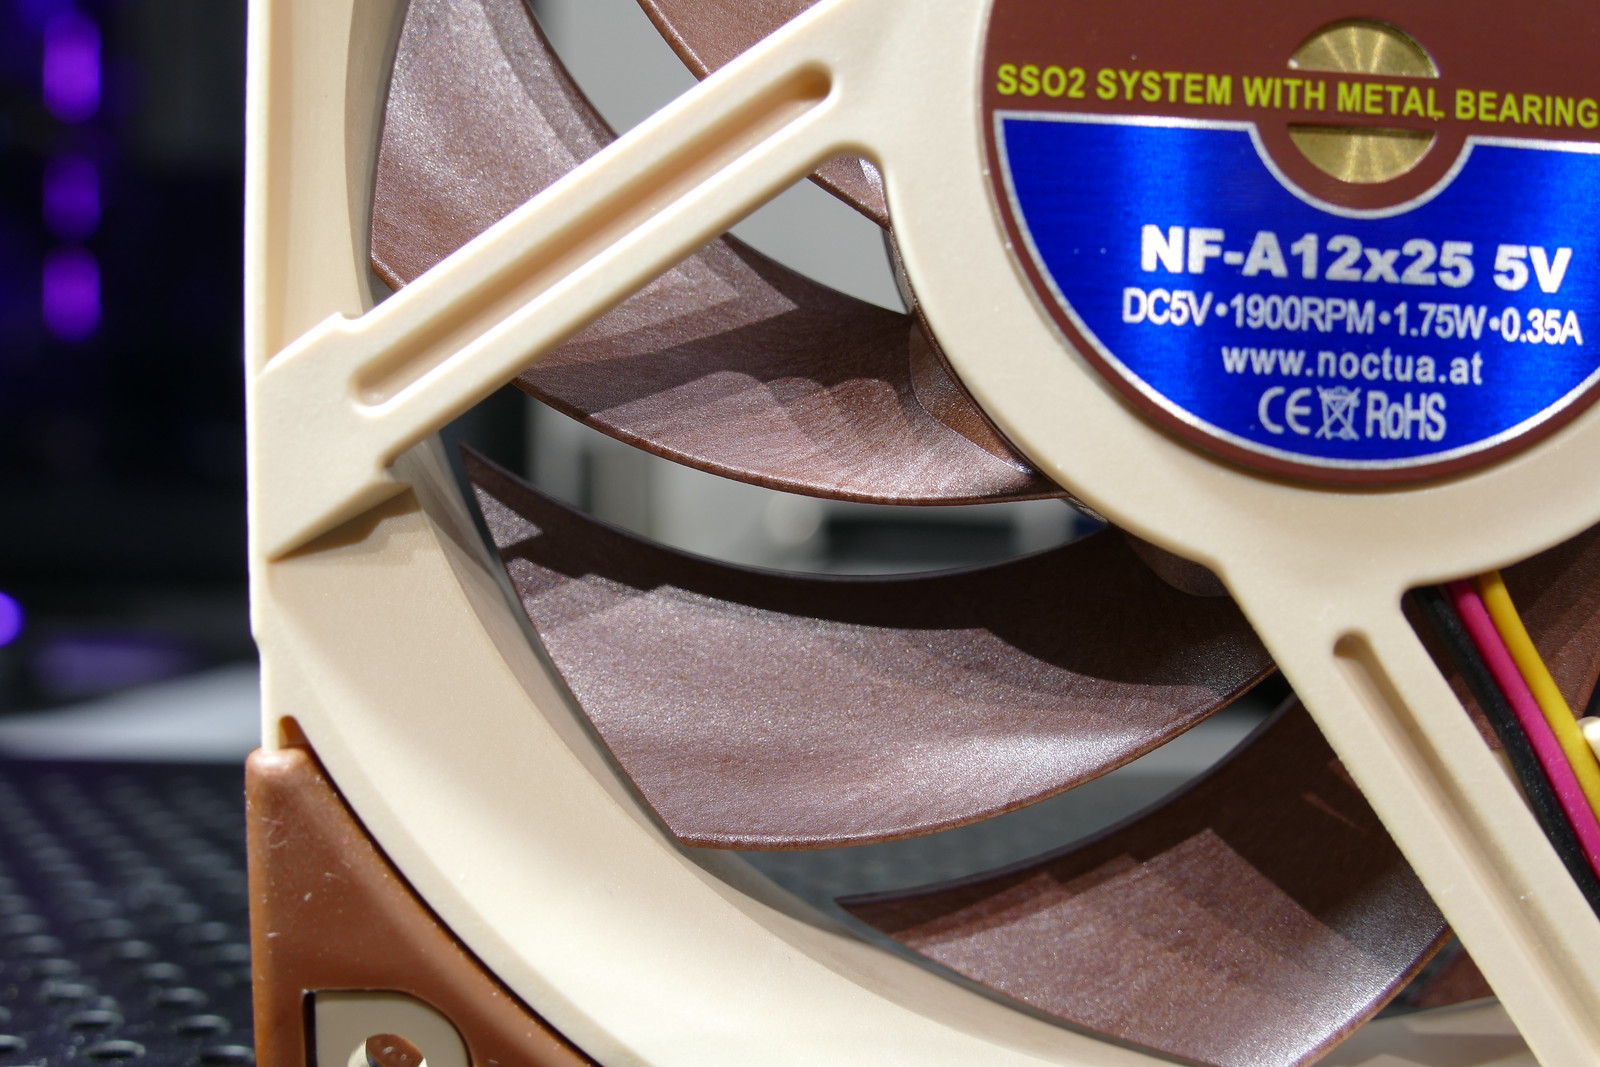
https://www.flickr.com/photos/57993471@N06/43395501561/

Call me crazy, but I've fallen in love with a cooling fan.

The Noctua NF-A12x25 (link to standard PWM version for use in PCs) is by far the most technologically advanced fan ever made by the Austrian cooling solutions company. It took four and a half years to develop with more than than 200 prototypes made, and even required the development of an expensive, proprietary plastic material for the impeller. The result is an engineering masterwork of a fan that outperforms anything else like it.

The specific version of the NF-A12x25 I have is the 5V model. While this means that it's not directly usable in most PCs, as fan headers are typically 12V, the 5V version comes with a USB adapter, which opens up endless new possibilities. One can now use it to cool practically anything, from set-top boxes to mini-fridges (that was my idea). This particular model, along with several other 5V fans spanning nearly the entire Noctua lineup from 40mm to 200mm, was announced on July 4, 2018.

The key to the NF-A12x25's impressive performance is a proprietary liquid-crystal polymer called Sterrox. LCPs are a unique class of plastics which exhibit very high rigidity and strength due to their molecular structure, which is more orderly than those of traditional plastics. Noctua went through the trouble of developing their own plastic material because a key design goal was to minimize tip clearance: the spacing between the tip of the impeller blades and the frame. With conventional plastics like PBT, over several years of continuous use, the blades can actually stretch slightly, which means there needs to be some leeway between the impeller and the frame. However, this gap results in some airflow being lost, and in situations requiring high static pressure, like a fan attached to a processor heatsink or liquid cooler radiator, air can leak back through this gap. LCPs like Sterrox exhibit far better stability over time and therefore allow for a much narrower tip clearance, as little as 0.5mm, when most PC case fans have closer to a 1.5mm to 2mm gap. (Notice, in the image above, just how close the blades are to the frame!) The high rigidity of the Sterrox material also makes the fan blades less prone to surface vibrations which can create added noise during operation.

Thursday, December 28, 2017

$60 is not enough: The problem with video game development costs and monetization

As a video game consumer, I am deeply concerned about recent trends in game design and monetization.

Over the last few months, several major premium "AAA" game titles, including Middle-earth: Shadow of War, Star Wars Battlefront II, and Forza Motorsport 7, have launched with a relatively new and controversial type of in-game item known as a loot box. Loot boxes, when opened, provide one or more random in-game items, which are not known until they are opened. Depending on the game, these can range from cosmetic modifications such as skins that have no impact on gameplay, to weapons, armor, and other equipment which significantly alter gameplay. Items in a loot box are typically grouped by rarity, and some items available from loot boxes can be more desirable than others, such as a rare skin for a playable character or a particularly powerful weapon. This encourages players to acquire more loot boxes for more chances to get better items. Depending on the game, loot boxes can be obtained over the course of normal play, with in-game currency, and/or with real money.

The random nature of loot boxes leverages the same psychological principles behind gambling to make the process of obtaining and opening them addictive. This is further reinforced by the fact that games which use loot boxes often do not permit players to purchase specific items directly, even with real-world currency. The game's mechanics are also often designed to encourage purchasing loot boxes by making it difficult and time-consuming to progress in a game through normal gameplay. As a result, loot boxes have drawn regulatory attention, with some jurisdictions considering treating loot box systems as gambling. The gambling-like nature of loot boxes has also drawn sharp criticism from both the press and the player community, which consider such systems to be predatory to consumers while degrading the game experience for those who do not pay for loot boxes. Compounding this is the fact that players already need to spend up to US$60 to begin playing the game in the first place.

More generally, the use of microtransaction systems which allow players to purchase in-game items with real money has drawn criticism, especially where such purchases allow paying players to obtain a significant advantage over others in competitive multiplayer gameplay or where the game's mechanics are balanced in such a way that they make normal progression unusually tedious without real-money purchases.

These trends in video game monetization have led to gamers claiming that the video game industry has become greedy and exploitative of its customers. With major game publishers like Take-Two Interactive reporting significant increases in revenue and profit, this can certainly appear to be the case. However, the truth is far more complicated than this.

Monday, December 4, 2017

How to save energy on gaming: Experiments with lowering power target on the GeForce GTX 1080 Ti

Before I begin, I'd like to provide some relevant background information.

My bedroom has a tendency to trap heat, and is usually the warmest room in the house. It also faces west, which means that in the summer months, the room can get unbearably hot unless the central AC system is turned on full-blast, complicated by the fact that there is only one HVAC register in the room. With the Astaroth desktop's power draw often exceeding 400W under full gaming load, converting most of this energy into heat, keeping the room at a reasonable temperature during long gaming sessions can be challenging.

This led me to the question: How do I get the system to run cooler and use less energy without unacceptably degrading game performance? Read on for the answer...

Sunday, December 3, 2017

Overview of the Astaroth desktop

Throughout this blog, I'll be referencing Astaroth, my custom-built desktop named after the demon in the Ars Goetia. This post will serve as an overview of the system and its capabilities.

Astaroth is an AMD Ryzen-based full-tower desktop PC designed for both gaming and workstation applications. It is the first desktop built entirely on my own, and represents the largest investment I've ever made into any computer, emphasizing long-term performance, scalability, and upgradability. Here are the specs:
  • ASUS ROG Crosshair VI Extreme AM4 EATX motherboard
  • AMD Ryzen 7 1800X (8C/16T @ 3.64.0+ GHz)
  • Corsair H100i v2 240mm liquid cooler with AM4 retention bracket
  • 32 GB (2x16GB) G.SKILL Ripjaws V DDR4-3200 memory (operating at 2933 MT/s)
  • EVGA GeForce GTX 1080 Ti FTW3 Gaming (3584 CUDA cores @ 1569–1683+ MHz, 11 GB GDDR5X @ 12 Gbps)
  • 1 TB (1,024 GB) Samsung SSD 960 PRO for boot and applications
  • 1 TB (1,024 GB) SanDisk Ultra 3D SSD for bulk storage
  • 500 GB Samsung SSD 860 EVO for virtual machines and scrap space
  • Seasonic PRIME Titanium 850W power supply
  • Corsair Graphite 760T full-tower case
  • Dell S2417DG gaming monitor (23.8" TN, 1440p 144+ Hz with G-SYNC)
Astaroth will serve as my primary platform for much of my benchmarks, gaming, and performance tuning. I've posted pictures of the rig on Flickr if you'd like to take a closer look.

Draco

Hello, world!; or, an introduction to the Dragon's Journal

Last updated February 19, 2019.

Welcome to the Dragon's Journal! Here's some relevant background for those of you who are new here:
  • Much of this blog will be about technology, especially as it relates to desktop computing and gaming. I'll be writing about developments in PC technology as well as on experiments with my own computing gear.
  • You might see lots of references to italicized names like Astaroth, Stolas, or the Dragon. More often than not, these refer to one of my computers:
    • Astaroth is my custom-built high-performance desktop, built around an AMD Ryzen 7 processor and a GeForce GTX 1080 Ti. This demon is equipped with 32 GB of RAM and a total of 2.5 TB of all-flash storage. While I consider this to be my flagship PC, it's now used primarily for more demanding applications like gaming and photo editing because it consumes more power at idle than my main laptop Stolas (below) does under load. More details about this system can be found in this blog post.
    • Stolas is my primary laptop, a 2018-model HP ENVY x360 13. This 2-in-1 laptop is equipped with a Ryzen 7 2700U (Raven Ridge) processor, 8 GB of memory, and a 256 GB NVMe SSD. The processor delivers excellent performance for everyday use and can even handle light gaming, though the battery life is substandard (typically about 4-6 hours) due to its relatively high idle power consumption. On the flip side, it does support USB Power Delivery via its USB-C port and having a power bank that supports USB PD lets me keep this system charged even away from a socket.
    • Bifrons is an inexpensive Lenovo netbook, specifically a Lenovo Flex 4-1130. It's cheap and very limited in its capabilities, with a dual-core Atom-type Intel Celeron processor and just 2 GB of RAM, along with 64 GB of eMMC flash, but it's reasonably compact and has decent battery life. Although it's mostly fallen by the wayside, it's still occasionally used as an ultra-low-power Linux (openSUSE Leap 15.0 with KDE Plasma 5) system.
    • The Dragon is my older gaming laptop, powered by an Intel Core i7 (Haswell) quad-core processor and a GeForce GTX 780M. This system has been retired in favor of Astaroth and Stolas due to a damaged CPU heat sink. The system had 24 GB of RAM, a 512 GB solid-state drive, and a 750 GB electromechanical hard drive. The drives have since been repurposed as external storage devices using enclosures and adapters.
    • The Wyvern was a very old HP Pavilion dv6z-3000 laptop. It was custom-built by HP and had a quad-core AMD Phenom II processor, Mobility Radeon HD 5650 graphics, 8 GB of RAM, and 640 GB of hard disk storage. This system has since been dismantled and disposed of.
  • Unless otherwise specified, all content on this blog is licensed under CC BY-SA 4.0. Feel free to redistribute my content, but please give me credit for my work. The preferred attribution is a link to the original blog post and the name Brian Wong (bwDraco). Links should be readable by search engines and should not specify "nofollow".
  • For those of you who are Stack Overflow or Stack Exchange members, I can often be found in the Root Access chat room.
Once again, welcome, and I hope you enjoy reading this blog!